NVR web interface - Playback
This lets you review recorded video.
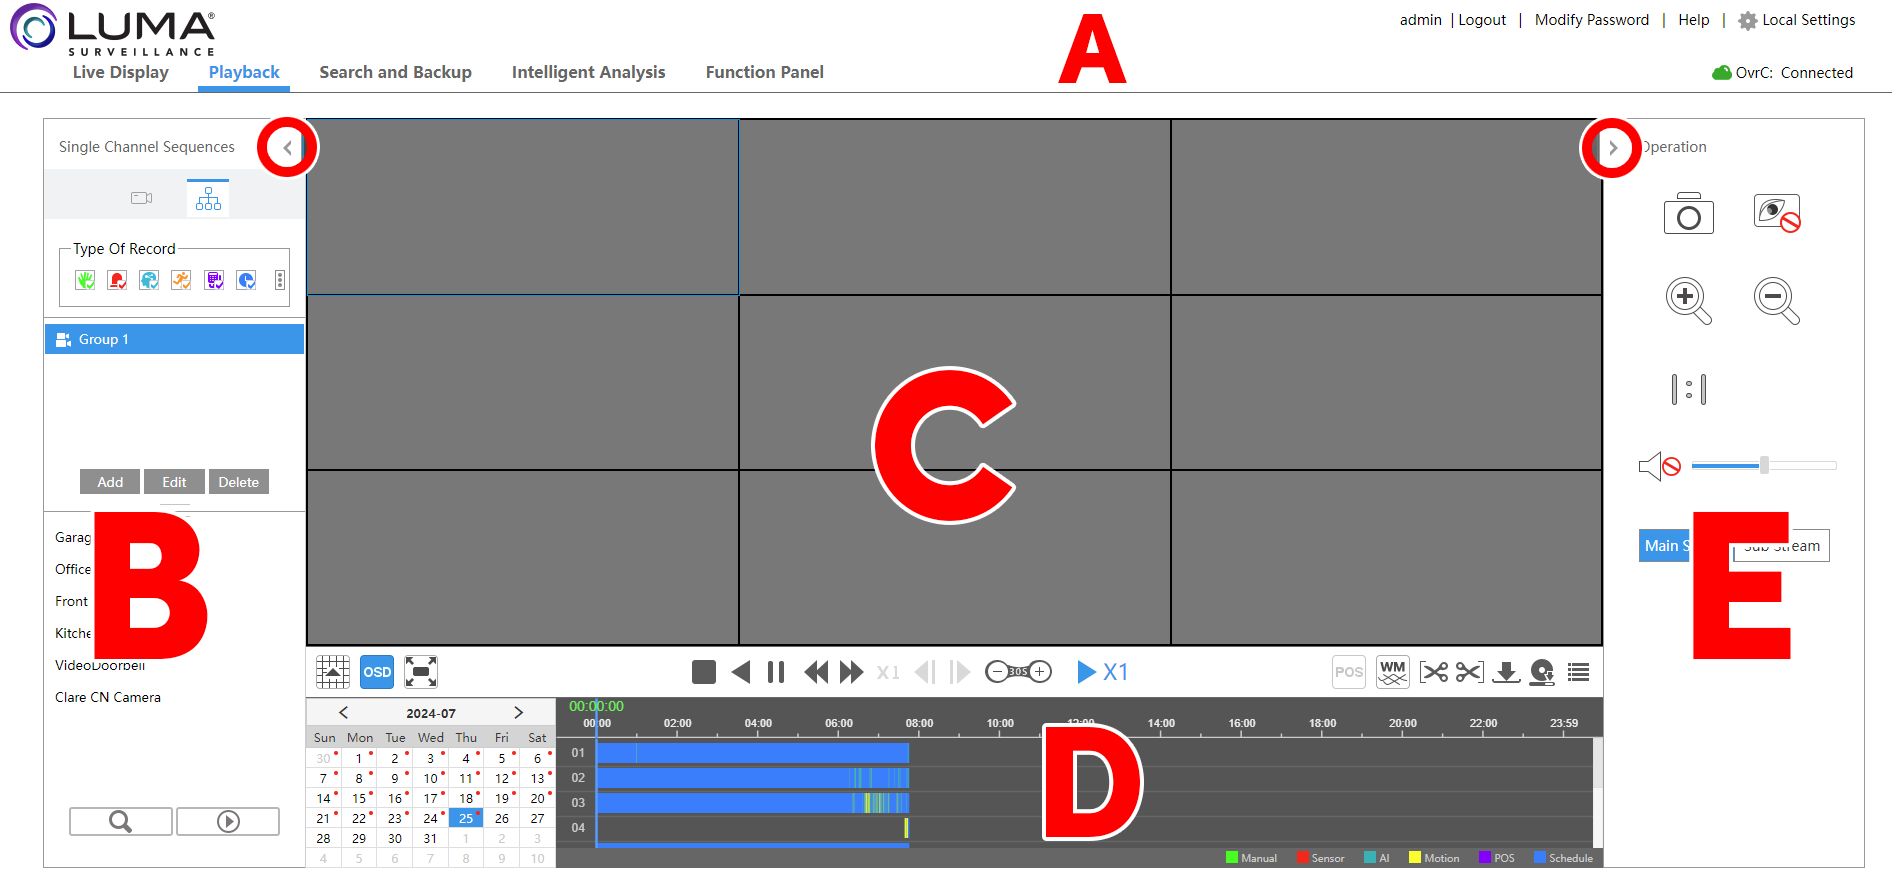
- (A) Main controls
- (B) Left flyout panel
- (C) Video area
- (D) Calendar and timeline
- (E) Right flyout panel
Main controls
At left, beneath the logo, are the various tabs of the web interface.
At the top right, if the system detects you need it, is a hotlink to download a plugin for your browser. After that, the NVR shows the name of the account you are using, a hotlink to log out, and a hotlink to change the account's password.
Below that, the NVR displays the latest OvrC status.
Left flyout panel
This area holds camera and incident filters that assist in finding specific recordings. Click the chevron at top to collapse or expand this panel.
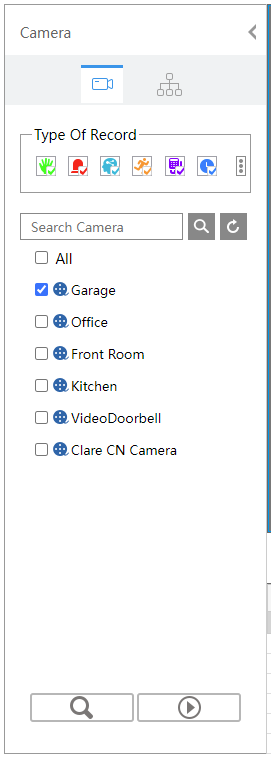
Camera tab
At the top, select the events to search for. Click the ![]() icon to switch between the Ordinary and AI menus. You cannot search for events from both menus; you must choose one or the other.
icon to switch between the Ordinary and AI menus. You cannot search for events from both menus; you must choose one or the other.
Ordinary events menu:
-
 Manually recorded
 -
 Sensor or alarm events
 -
 AI analysis (comprises both regular motion and AI motion)
 -
 Motion activity
 -
 POS events
 -
 Scheduled sessions
AI events menu:
-
 Ordinary events (continuous and/or normal motion events)
 -
 Line crossing events
 -
 Intrusion events
 -
 Exception detection
Below is a list of the cameras. When searching for an archive, use the checkboxes to select any or all of the cameras.
Enter a camera name in the search box to find a specific camera, or click refresh to update the list.
At the bottom, click the search button to display all records that match the filters. Click the play button or click on the timeline to begin playback.
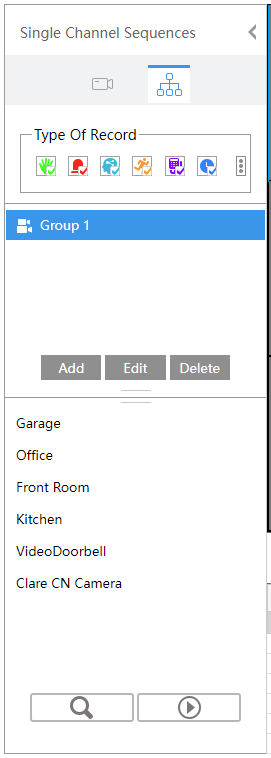
Sequences tab
You can also select sequenced streams to view.
At the top, select the events to search for. Click the ![]() icon to switch between the Ordinary and AI menus. You cannot search for events from both menus; you must choose one or the other.
icon to switch between the Ordinary and AI menus. You cannot search for events from both menus; you must choose one or the other.
Ordinary events menu:
-
 Manually recorded
 -
 Sensor or alarm events
 -
 AI analysis (comprises both regular motion and AI motion)
 -
 Motion activity
 -
 POS events
 -
 Scheduled sessions
AI events menu:
-
 Ordinary events (continuous and/or normal motion events)
 -
 Line crossing events
 -
 Intrusion events
 -
 Exception detection
All the groups you have set up show just below the event selection. Double-click on a group to display those cameras, one to a channel (depending on the number of cameras and their streams, there may be a processing display). Below the divider, it displays the cameras in the selected group.
At the bottom, click the search button to display all records that match the filters. Click the play button or click on the timeline to begin playback
Video area
Here you view the recordings.
Click the play button (in the left flyout panel), or click in the timeline (at bottom center), to begin playback at that point.
The video toolbar
-
Select single-camera or multi-camera view. If you are not running a PC that has the Luma plugin installed, this button changes to two buttons, one each for a single-channel and four-channel display.
-
Displays (or hides) the recording status symbols: green stands for manual recording, red stands for sensor-based recording, yellow stands for motion-based recording, blue stands for scheduled recording, and cyan stands for AI recording.
-
The full-screen button works with any view. Right-click to end full-screen mode.
-
Stop
-
Play in reverse / pause
-
Play / pause
-
Slower playback: Click this to halve playback speed (in whichever direction).
-
Faster playback: Click this to double playback speed (in whichever direction).
-
Resets the playback speed to real-time.
-
If playback is paused, click these to move one frame backward or forward.
-
Click the buttons to jump the stream backward or forward by 30s.
-
This indicates the playback dorection adn spoeed. It is nto interactive.
-
Enable a POS insert
-
Add the watermark you set up for the system to in the lower left corner. Watermarks are on by default (if you don't see one, it is not yet configured).
-
Adjust start and end times for a clip to be downloaded
-
Download files to network drives. USB drives, or your local hard drive.
-
This displays the export queue for this session. Do not leave the Playback page until downloading is complete or you will lose your work.
-
Opens the entire list of recorded items for that camera on that day. You can download and play from this list.
Calendar and timeline
All recordings for the selected camera(s) on the date selected in the calendar are displayed in the timeline at right. Click anywhere in the timeline to begin playback at that time.
Right flyout panel
This area provides extra controls. Click the chevron at top to collapse or expand this panel.
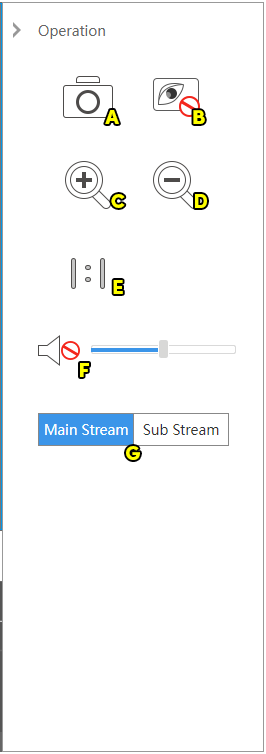
Operation tab
At the top are several command buttons, described left to right by row.
-
Snapshot: Take a photo of the active camera feed.
-
Close Image: Suspend the video feed.
-
Zoom In: Click this, then click and drag in the camera's screen to zoom in on that area.
-
Zoom Out: Click this to expand the field of view.
-
Restore Original Proportions: Returns the display to its original size.
-
Enable/Disable Audio: When enabled, use the slider to adjust the volume of the camera's microphone as it plays through your computer's audio output.
-
Stream: Select which of the active camera's streams to view. Unlike the live display, you cannot edit the sub stream parameters.


